Plenty of professionals flock to WordPress due to its low learning curve and ample set of features. It’s the perfect solution for displaying your professional achievements – that is, if you know how to use it. If you’re not quite sure where to begin, let’s talk about some killer WordPress portfolio tweaks!
A great portfolio should meet three simple criteria – it should put the focus on your work, introduce yourself to prospective clients, and remain simple to navigate. Fortunately, all three are easy to achieve when using WordPress.
In this post, we’ve selected three live examples of stunning portfolios, and here we’ll teach you how to replicate some of their design tricks. Let’s dive in and look through these WordPress portfolio tweaks together:
Three Killer Portfolios and How to Emulate Them 😎
A.H.A. Design
A.H.A. Design is a London-based design company focusing on architecture, product design, and web design. Although we can’t personally vouch for the quality of their work, their portfolio caught our eye thanks to its unique style.
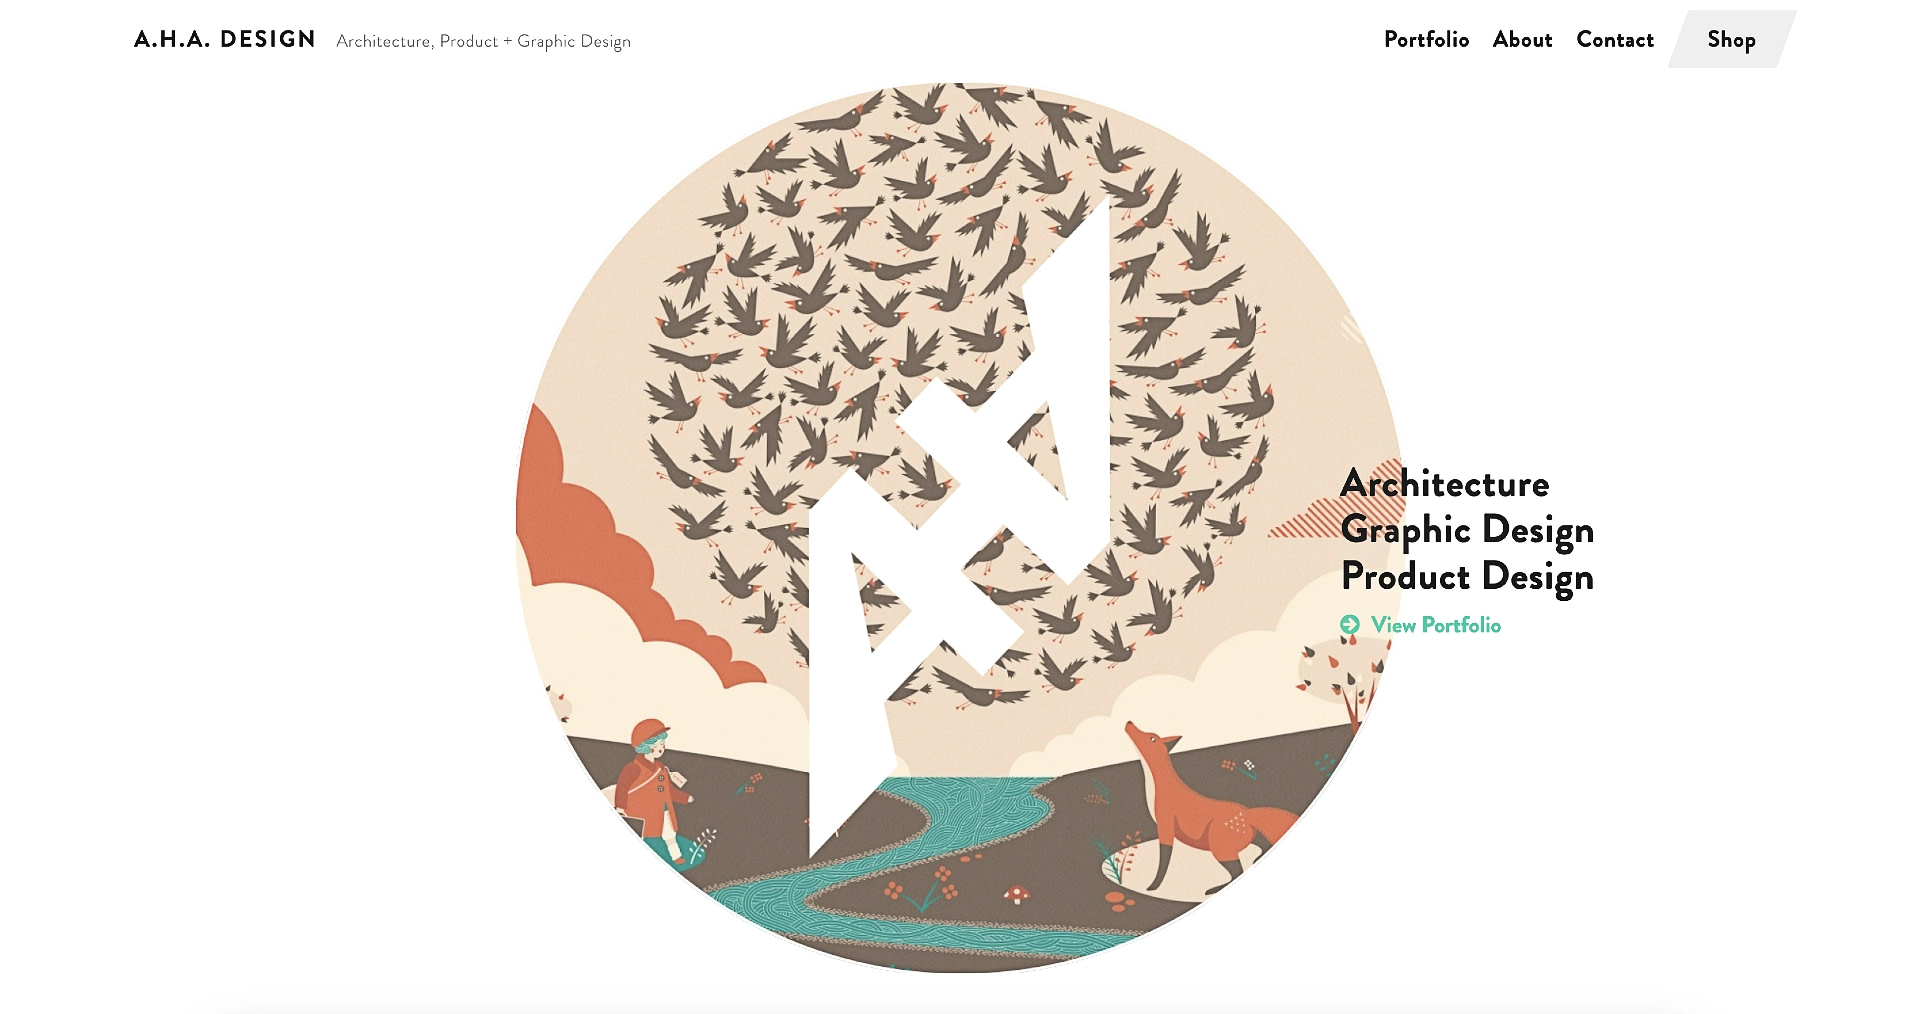
What makes this portfolio stand out?
- A clean, uncluttered design.
- The subtle highlighting of the Shop menu item.
- The use of circles throughout the entire site to highlight A.H.A. Design’s past work.

Let’s elaborate a bit further on that last point. The first thing you’ll see on the main page is a giant circle that showcases previous works – the rest of the portfolio appears below as big circle blurbs, including simple hover animations.
Another aspect that makes this design choice stand out is the monochromatic color scheme throughout the site – the portfolio pieces are the only elements that have colors. This technique adheres to our rule about keeping the focus on your work. In fact, we like it so much we’ll try to pull off a similar effect using the block patterns in our Otter Blocks plugin.
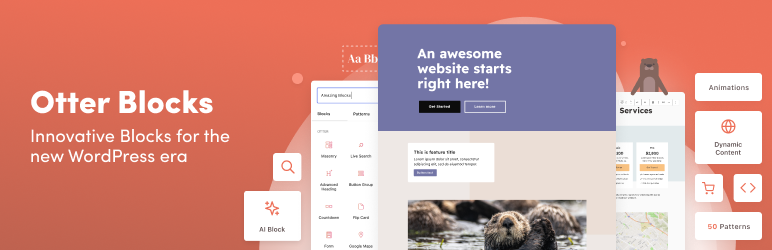
WordPress Portfolio Tweaks #1: Use blurbs to showcase your work
The Otter Blocks plugin enables you to mimic the effect we’ve just discussed using its block patterns. The main difference is that A.H.A.’s design features circles, while the Otter block pattern has squares:

You can, of course, edit all of the sections and remove any parts you don’t want. For example if you didn’t want the buttons underneath the text, you could easily delete them in just three clicks (like any other block in the block editor).
To pull it off, first install and activate Otter Blocks:
After installing and activating the plugin, go to your desired page or post, click on the (+) sign in the upper left corner, and then from the sidebar popup menu, select Patterns to display all the available patterns. Next, click on Otter Blocks to show the block patterns unique to Otter, and then scroll until you find the one you saw above.

Click on the pattern to insert it into your page or post and then tweak it to your liking. If you want, you can even jazz it up a bit by adding various kinds of animations to the images. Visitors will see these when they scroll down to the section where you inserted the pattern.

SocioDesign
SocioDesign is another London-based design agency whose portfolio site piqued our attention due to its unique style. Let’s review our favorite parts.

What makes this portfolio stand out?
- A minimalistic design featuring eye-catching images of previous SocioDesign works.
- Their simple layout, which keeps navigation easy.
- The use of an asymmetrical grid to display part of a portfolio on the homepage.
WordPress Portfolio Tweaks #2: Use an asymmetrical grid system to make your work stand out
Image grids are a rather conventional design element these days – they’re efficient, but they can also get a bit monotonous. To change it up, designers sometimes break the mold a little by assigning different sizes to some of the images, such as the example from the SocioDesign homepage (visible above).
This serves two purposes – it breaks the monotony of a regular grid, and also establishes a visual hierarchy. This means we automatically assign more importance to the largest section of the grid. If you want to create a portfolio on WordPress, this technique can help to guide attention towards the projects you’re most proud of. We can replicate this effect using the Masonry block inside of Otter Blocks:

If you follow this process, the final result should look something like this (albeit with different images, of course):

If you notice in the screenshot above, we highlighted the Add button and the customization area. The Add button is self-explanatory: you use it to continue adding additional images to your gallery. The customization options allow you to choose how many columns you want and make other design tweaks:

Lorenzo Bocchi
Finally, we come to Lorenzo Bocchi. Lorenzo has an eclectic portfolio that’s impossible to ignore. Let’s check out its highlights below.

What makes this portfolio stand out?
- The main header and the sections below it on the homepage make great use of some cool visual effects.
- The header has a simple color scheme with a mission statement to make a strong first impression.
- There are links to multiple work examples included on the first page.
- Typing animations further enhance the overall user experience.
WordPress Portfolio Tweaks #3: Use a simple color scheme and a full-width header to make a strong first impression
Our favorite aspect of Lorenzo’s portfolio is the full-width header with the slight sideways parallax effect as you scroll down. Learning how to create a sideways parallax effect is a complex subject, so we’ll stick to creating a simple color scheme and implementing a full-width header using the Neve FSE theme and the Full Site Editor.
Neve FSE has a header template that you can customize inside the Full Site Editor – including the option to make it full width. After installing the theme, head to the editor by going to Appearance —> Editor inside your WordPress dashboard.
Here you will see a menu. Select the bottom most option – Patterns:

On the next screen you’ll be faced with another menu. Select the bottom most option again, which is Manage all template parts. That will bring you to the screen you see below, where you’ll select Header, so you can begin editing the Header template.

The fastest way to get a full-width header with a simple color scheme is to click on the Template Kits button.

Then, once you’re inside the Template Kits, choose the Patterns option in the middle, and then click on Heading to display the pre-made heading patterns:

Once you choose the header pattern you want, click on it, and it will be inserted into your header template.
Now all that’s left to do is edit the text – we’ll leave that up to you – and to set the container to full-width.
Setting the container to full-width can feel a bit clunky and you might think you’re doing something wrong at first. Don’t worry, you’re not. It can sometimes take a few clicks until you can get the editor to highlight the container. In case you don’t select it on your first try, the trick here is to click the left most button on the popup menu:

Every time you do this, it moves your selected area to the block that contains the block you were just on. In other words it moves you from the micro to the macro until you eventually get to the parent block, which in this case is going to be the container housing our header pattern. From here you can set the container width to full-width:

If you did everything correctly, you’ll have a clean, full-width header that shares a color palette with your menu, keeping things looking uncluttered. Consider using a variation of this simple style the next time you’re performing some WordPress portfolio tweaks and don’t forget to save your changes.
Last word on WordPress portfolio tweaks 💬
Along with a suitable theme, there are three basic criteria for creating a portfolio on WordPress – it should focus on your work, introduce you, and offer simple navigation.
Get all three right, and you’ll be well ahead of your competition.
Consider implementing one or more of these three simple techniques when you begin to create a portfolio on WordPress, and you’ll be hearing back from new clients in no time at all:
- Use blurbs to showcase your work.
- Implement a grid system to display your past projects.
- Combine a full-width header with a simple color scheme to make a lasting first impression.


Or start the conversation in our Facebook group for WordPress professionals. Find answers, share tips, and get help from other WordPress experts. Join now (it’s free)!