
Most sites play it safe when it comes to navigation. Developers and designers will set up a navigation bar at the top of each page, include a few links to major sections, and call it a day. However, there’s no need to limit yourself to a single WordPress navigation structure, especially when you have the option to shake things up by creating your own custom WordPress sidebar.
Using a custom sidebar will enable you to try out a different look for your site. It can also provide you with an interesting way to implement new features, such as adding custom elements or advertisements for individual pages and displaying your most popular posts.
Furthermore, you get access to more space than a regular top-bound navigation bar can provide. In this article, we’ll discuss ⏩ why you should consider using a custom WordPress sidebar, and teach you ⏩ how to set one up using the free Custom Sidebars plugin. Let’s get started!
Why you should consider using a custom WordPress sidebar 💡
Trying out a new WordPress navigation structure should be about more than just style – it should also be about functionality. After all, the primary purpose of a navigation tool is to make your users’ lives easier.
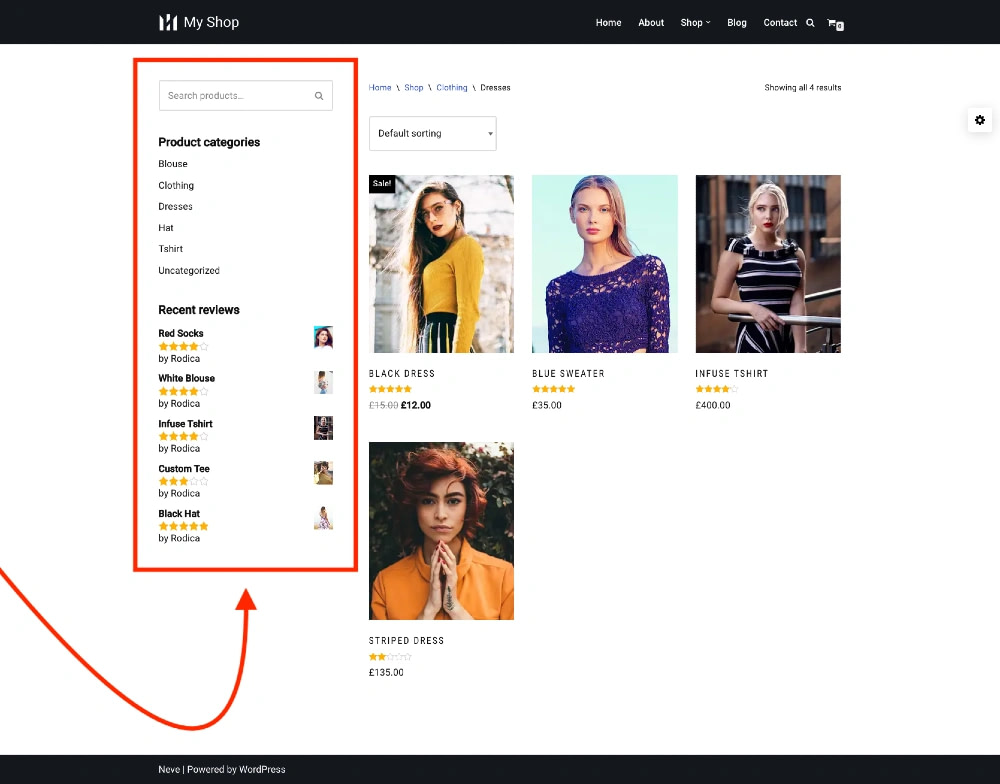
The Neve theme pre-built starter site “My Shop” features a clean and practical sidebar.
A plain old navigation bar at the top of your website will work in many cases, but a custom sidebar can sometimes be the better choice. There are several reasons for this, including:
- You can use custom widgets on specific pages. WordPress sidebars enable you to use widgets as elements. With the right plugin (which we’ll cover in a moment), you can create tailored sidebars for each of your pages. For example, you can use this type of menu to display links to your most popular posts alongside your latest pieces, or you can display your most recent comments to incite discussion.
- You’ll stand out visually. Top-bound navigation menus are almost ubiquitous these days. A simple sidebar can help you stand out from other sites by making your design more memorable.
- You can add content personalization. With a custom sidebar, you can display navigation links and other content that fits more closely with the content on each page.
Custom sidebars can enhance existing navigation, too
That said, not every website needs to eschew convention and opt for a sidebar. In some cases, your design may lend itself better to a traditional navigation menu. However, custom sidebars can still come in quite handy if you need to add extra functionality to your site. For an example, take another look at the above image, which shows a theme that uses a sidebar to add a search widget, a filter by price function, and product categories.
If you feel there’s a particular page on your site that needs extra features, but you’re not sure where to include them, adding those features with a custom sidebar can be the smart choice. On the other hand, if you use a single traditional sidebar throughout all your pages, and you can’t think of any new features to add that would increase your site’s usability, you might want to stick with a traditional menu.
As for where to locate your sidebar, it’s mostly a matter of personal taste. Some designers lean towards placing them on the left side of the page if they include elements that can help with navigation. For more traditional sidebars, you’ll probably want to stick to placing them on the right, since that’s what users tend to expect.
With that out of the way, let’s focus on learning how to add a custom WordPress sidebar to your site.
How to create a custom WordPress sidebar (in 2 steps)
For this tutorial, we’ll be using the Custom Sidebars plugin. This simple tool enables you to replace your core WordPress sidebar with more customizable options. With it, you’ll be able to create multiple new sidebars and assign them to specific pages, posts types, and categories (among other options).

Naturally, there are plenty of other tools for creating custom sidebars in WordPress, but few are as intuitive as this one. In fact, we can teach you how to to use it in just two steps.
- Step 1: Create your first custom WordPress sidebar
- Step 2: Specify the location for your new sidebar
Before we jump in, remember to install and activate the plugin first.
Step 1: Create your first custom WordPress sidebar
Once the plugin is up and running, you’ll find an option that reads Create a new sidebar under Appearance > Widgets on your dashboard. Click on it, and you’ll be able to choose a name and a description for your custom sidebar:

If you plan on setting up more than one sidebar, remember to pick a descriptive name so you’ll be able to remember which sidebar is which. Your new addition will appear under the Custom Sidebars section.
Now, all you have to do is drag and drop the elements you want from the Available Widgets column to your new sidebar:

For example, we created a custom sidebar named Archives Sidebar and dragged both an Archives and a Recent Posts widget into it:

If you’ve ever customized a regular WordPress sidebar you’ll feel right at home. The real difference lies in step number two. It’s worth noting that Custom Sidebars doesn’t add any new widget options to WordPress. If you want to try out new elements, you’ll need to explore other options.
Step 2: Specify the location for your new sidebar
When you create a new custom sidebar, it won’t appear on your front end until you tell the plugin where it should go. To do this, return to the Custom Sidebars section under Appearance > Widgets. Find the sidebar you want to add to your site and click on Sidebar Location:

On the following screen, you’ll get the chance to choose from an extensive list of criteria including sidebar and footer options. For example, selecting the As sidebar for selected categories option will enable you to choose the categories you want the sidebar to appear on:

After selecting your criteria, remember to save your changes, and you’ll be all set.
On the other hand, if you want to add a custom sidebar to a specific post or page, you’ll need to edit that specific page. When the plugin is enabled, a new Sidebars widget will appear in the WordPress editor for your new and existing posts:

All you need to do here is pick the custom sidebar(s) you want for the locations that are available. If you want to use a single option, just leave the rest blank and WordPress will go with your default settings instead.
Final thoughts on how to add a sidebar in WordPress 💭
There’s no need to recycle the same sidebar structure for all your content, particularly when WordPress offers plenty of alternatives. Creating a custom sidebar can enable you to shake up your site’s design and add unique elements depending on which page your users are browsing.
Plus, it can make navigating through your site easier, which is always desirable. Best of all, setting up a custom WordPress sidebar doesn’t need to be difficult, particularly if you’re using the Custom Sidebars plugin.
All you need to do is install and activate the plugin, create your first custom sidebar, specify its location, and repeat the process if you intend to set up more than one.
Do you have any questions about how to set up custom WordPress sidebars? Ask away in the comments section below!


Or start the conversation in our Facebook group for WordPress professionals. Find answers, share tips, and get help from other WordPress experts. Join now (it’s free)!