In WordPress 5.8 (released in July 2021), WordPress made a big change to the WordPress widget editor, switching it from the longstanding system to a new block-based widget approach.
Where before you used a custom editor in the WordPress widget editor, you’ll now use blocks to control the content in your site’s widget areas – the same blocks that you use when you create posts or pages.
In this article, we’ll introduce you to the new block-based WordPress widget editor and show you how it works. Then, we’ll look at seven of the most useful widgets and show you how to use them to their fullest potential. Let’s dive right in!
How the block-based WordPress widget editor works
To start, let’s go over how you can access and use the widget editor.
How to access the widget editor
You have two options to access the WordPress widget editor.
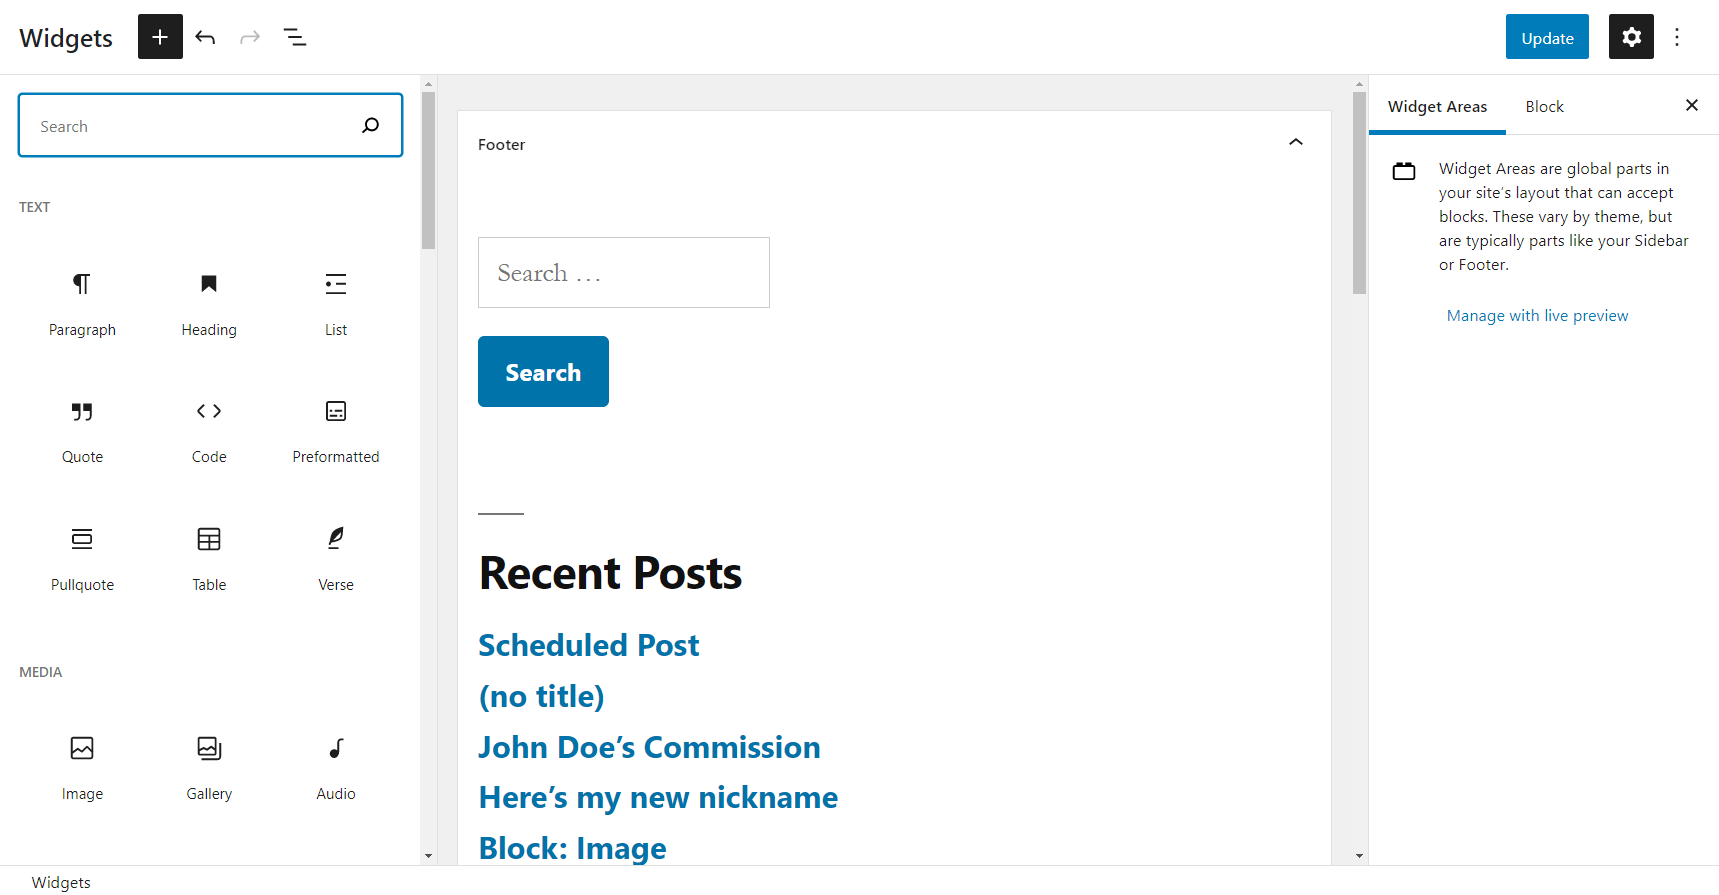
First, you can go to Appearance → Widgets to open the full widget editor interface:
Second, you can also access the widget editor from the WordPress Customizer by going to Appearance → Customize → Widgets instead:

Using the Customizer is nice because it lets you see a live preview of how your widgets will look on the frontend of your site. However, the downside is that you have less space for the actual editor.
For that reason, you might want to go to Appearance → Widgets for heavy-duty widget editing and then switch to the Customizer for your final touches.
How to use the WordPress widget editor
Whether you’re working in the dedicated WordPress widget area or the WordPress Customizer, the basic process for editing your widgets will be the same.
For our screenshots, however, we’re going to be using the dedicated WordPress widget area (Appearance → Widgets).
With the new block widget system, WordPress widgets now use the same block editor that you use to create posts and pages. If you’re not familiar with how it works, you can check out our guide to the WordPress block editor.
To add a new block/widget, you can click the plus icon in the top-left corner or the plus icon inside the widget area that you’re editing:

In the next section, we’ll look at some of the most useful block widgets that you can add.
To add text, you can add a Paragraph or Heading block and just click and type.
To edit a block widget’s full settings, you just need to click on it. Then, you can edit its settings in the sidebar (just like the regular block editor):

To move widgets between different widget areas, you can click on the “squiggle” icon and use the drop-down to choose which widget area to move it to:

If you want to edit a different widget area, just click on the arrow to expand it. For example, in the screenshot above, you could click on the Shop Sidebar widget area to edit the blocks inside that widget area.
Overall, everything in the new WordPress widget editor functions pretty much the same as the block editor, which is nice because it creates a consistent experience for editing your WordPress site and gives you access to more control over your widget areas.
The most useful WordPress block widgets
Now that you know how to use the new block-based WordPress widget editor, let’s look at seven of the most useful WordPress block widgets.
However, keep in mind that these aren’t your only options, and you may want to get familiar with other features, too.
1. Archives
The Archives widget organizes your past posts by month and year:

This navigation aid can help your audience quickly access older content. If you’re looking for an easy way to organize all those new blog post ideas for future users, this may be the best widget for the job.
We highly recommend that you turn on the Display as dropdown setting. This can help minimize the space that the Archive widget takes up without limiting its utility. You should especially consider doing this if you have an older site with lots of posts.
Finally, you may want to consider activating the Show post counts setting. If you haven’t stuck to a consistent posting schedule in the past, this can help direct users to your more productive months.
2. Latest Comments
As the name suggests, this widget displays the most recent comments across your site. It’ll also show which post the comment relates to, so you don’t have to worry about losing any context:

We think the best part of the Latest Comments widget is how effectively it shows off an active site. You can drive this point home even more by activating the Display date option.
If users see that other people are interacting with your posts, they may be encouraged to do the same. Furthermore, those being featured may appreciate the recognition. This personalized feeling can be particularly strong if your audience uses unique profile pictures.
Despite all these potential positives, you should probably pay attention to the display settings for this widget. Too many comments can slow down even the fastest WordPress themes. As such, we recommend that you limit the number of comments you display at once.
3. Latest Posts
The Latest Posts block can help keep your audience in the loop no matter where they are on your site. That’s because adding this widget will generate a list of your most recent content:

As such, it’s a simple way to provide quick access to your most recent work. As a result, users won’t have to go back to your homepage or main blog for new content – they can instead directly access the post that caught their attention.
Best of all, this widget is highly customizable. For example, you can choose to include details such as post excerpts or the author’s name. If your site relies heavily on visuals, you can also choose to display featured images.
If you only want to display some of your content, you can also filter out posts from specific categories and/or authors.
4. Social Icons
Providing your users with opportunities to connect with you on social media can help to expand your reach. That’s where the Social Icons widget comes in:
This feature helps you present links to popular social media sites like Facebook. You can also add less common ones such as Amazon. If you’re involved in their affiliate program, this can help you make more sales.
If you’re comfortable with using the WordPress widget editor in a stylistic sense, you may also want to consider adjusting the icon color palettes. You probably don’t want to stray too far from the recognizable designs, but even a subtle change may help these icons better fit your site’s theme.
5. Tag Cloud
Your WordPress site probably has some kind of tagging system in place. The Tag Cloud brings this feature front and center by displaying all of your tags in a group:

Moreover, each tag’s size is determined by the number of posts that use it. You can make this clearer by turning on the Show post counts setting. By communicating this information visually, you can help your users intuitively explore the most popular topics on your blog.
However, some sites have a clear tag system for search engine purposes. This can result in a long list of tags that even the Tag Cloud won’t be able to organize. If this sounds like you, consider using this widget to display categories instead. You’ll get the same navigational benefits without creating a huge block of text.
6. Navigation Menu
The Navigation Menu widget is another simple yet powerful block. This feature displays your chosen navigation menu wherever you place it:

Navigation is a critical part of your site’s UX. You probably already display your primary navigation menu in your header, but the Navigation Menu widget gives you the option to display a different menu in any widget area.
For example, you could create a separate menu for your footer links and use this widget to automatically display those links in your footer.
7. Search
The Search widget enables users to scour your site for content. It might seem simple, but knowing how to edit widgets even as straightforward as this one is important:

Similar to the Navigation Menu widget, we think the Search widget works best when it’s placed in a prominent place. This way, users can easily browse through your site and find answers to their queries.
Nevertheless, the default 100% width may not work with your site’s design. Fortunately, you don’t need to abandon this function altogether. Instead, you can customize the exact percentage width under the Display Settings options menu.
After you’ve set up this widget, you may also want to consider adding an autocomplete search function. This small change can add a touch of professionalism to almost any site.
How to disable block widgets and use the older WordPress widgets
The new block-based WordPress widget editor gives you a lot more flexibility than the older WordPress widget system. However, if you’d prefer to keep using the older widget system, you do have options.
Just like the Classic Editor plugin lets you disable the block editor, the official Classic Widgets plugin lets you disable block-based widgets and continue using the older WordPress widget editor.
There are no settings to configure – as soon as you activate the plugin, your site will go back to using the legacy widget system.
Get started with the WordPress widget editor
Running a website usually takes a fair amount of strategy. As such, it might not be enough to only know how to use the WordPress widget editor – understanding how to do so effectively is important, too. Fortunately, you can leverage the most useful features to their fullest potential with just a few clicks.
In this article, we showed you how the new block-based widget editor works and then we took you through seven of the most practical widgets. We explained their basic use and covered a few clever ways to optimize their contribution to your website.
If you want to be able to use your widgets in more parts of your site, you can also check out our guide on how to create a custom WordPress sidebar.
Do you have any questions about how to edit widgets more effectively? Let us know in the comments section below!


Or start the conversation in our Facebook group for WordPress professionals. Find answers, share tips, and get help from other WordPress experts. Join now (it’s free)!