
ImageMagick or Imagick is one of the libraries used by WordPress to optimize images on your site. However, by generating higher-quality images, they can also increase the size of your image files. This can slow down your site and result in a poor user experience. So, how to handle WordPress Imagick correctly?
Long story short, you can enable WordPress Imagick with an easy-to-use plugin. Then, you can make sure WordPress uses Imagick every time (over other image libraries). Meanwhile, you can configure your WordPress Imagick settings to prioritize quality or size to speed up your loading times.
In this post, we’ll take a closer look at WordPress Imagick. Then, we’ll guide 📚 you through three simple steps to enable Imagick on your website. Let’s get to it!
An introduction to WordPress Imagick
You might not know that when you upload a new image to WordPress, the platform automatically optimizes the image for you. To do this, WordPress relies on two PHP libraries:
- 👉 GD Library
- 👉 Imagick (a PHP extension that uses Image Magick)
Both of them are PHP modules that are already installed on your server (at most hosts).
GD Library and Imagick can be used by anyone to resize, crop, compress, and optimize images. Additionally, you can use them to change the contrast of images, increase the brightness, and add text overlay to your pictures.
Although these libraries work similarly, WordPress generally prefers to use Imagick over GD Library if both modules are installed on your server (as of WordPress 3.5).
This is because Imagick supports tons of image formats and typically results in a higher-quality image.
Why configure WordPress Imagick on your site
As long as your hosting server has the Imagick module installed (which almost all WordPress hosts will do), WordPress will most likely already be using Imagick to optimize your site’s images.
That is, you do not need to do anything just to enable WordPress Imagick optimization (assuming the module is already installed on your server).
However, you might want to customize how Imagick optimizes your images, either to use more aggressive optimization (which might reduce image quality somewhat) or to use less optimization (which will create higher-quality images, but at the expense of file size).
For example, if you run a photography website, you might want to adjust the WordPress Imagick settings to ensure that you’re not causing any drop in quality on your portfolio images.
Fortunately, you can use a plugin to customize the WordPress Imagick settings according to your preferences. Then, you can choose whether you want WordPress to prioritize speed or quality.
How to enable WordPress Imagick (3 Steps)
Now, let’s take a look at how to enable WordPress Imagick and configure the way the library manages your images.
- Step 1: Install and activate ImageMagick Engine
- Step 2: Customize the WordPress Imagick settings
- Step 3: Apply your WordPress Imagick settings to existing images
Step 1: Install and activate ImageMagick Engine 🖱️

The simplest way to enable and configure WordPress Imagick is to use a free WordPress plugin like ImageMagick Engine.
With this plugin, you’re able to instruct WordPress to use Imagick over the GD Library every time.
Better yet, you can optimize different images sizes for speed or quality, making it ideal for a variety of website owners. It’s also a great solution if Imagick isn’t currently activated on your server since you can enable is easily.
The plugin is totally free, so you can go ahead and activate it directly within your WordPress dashboard. Upon successful activation, navigate to Settings > ImageMagick Engine:
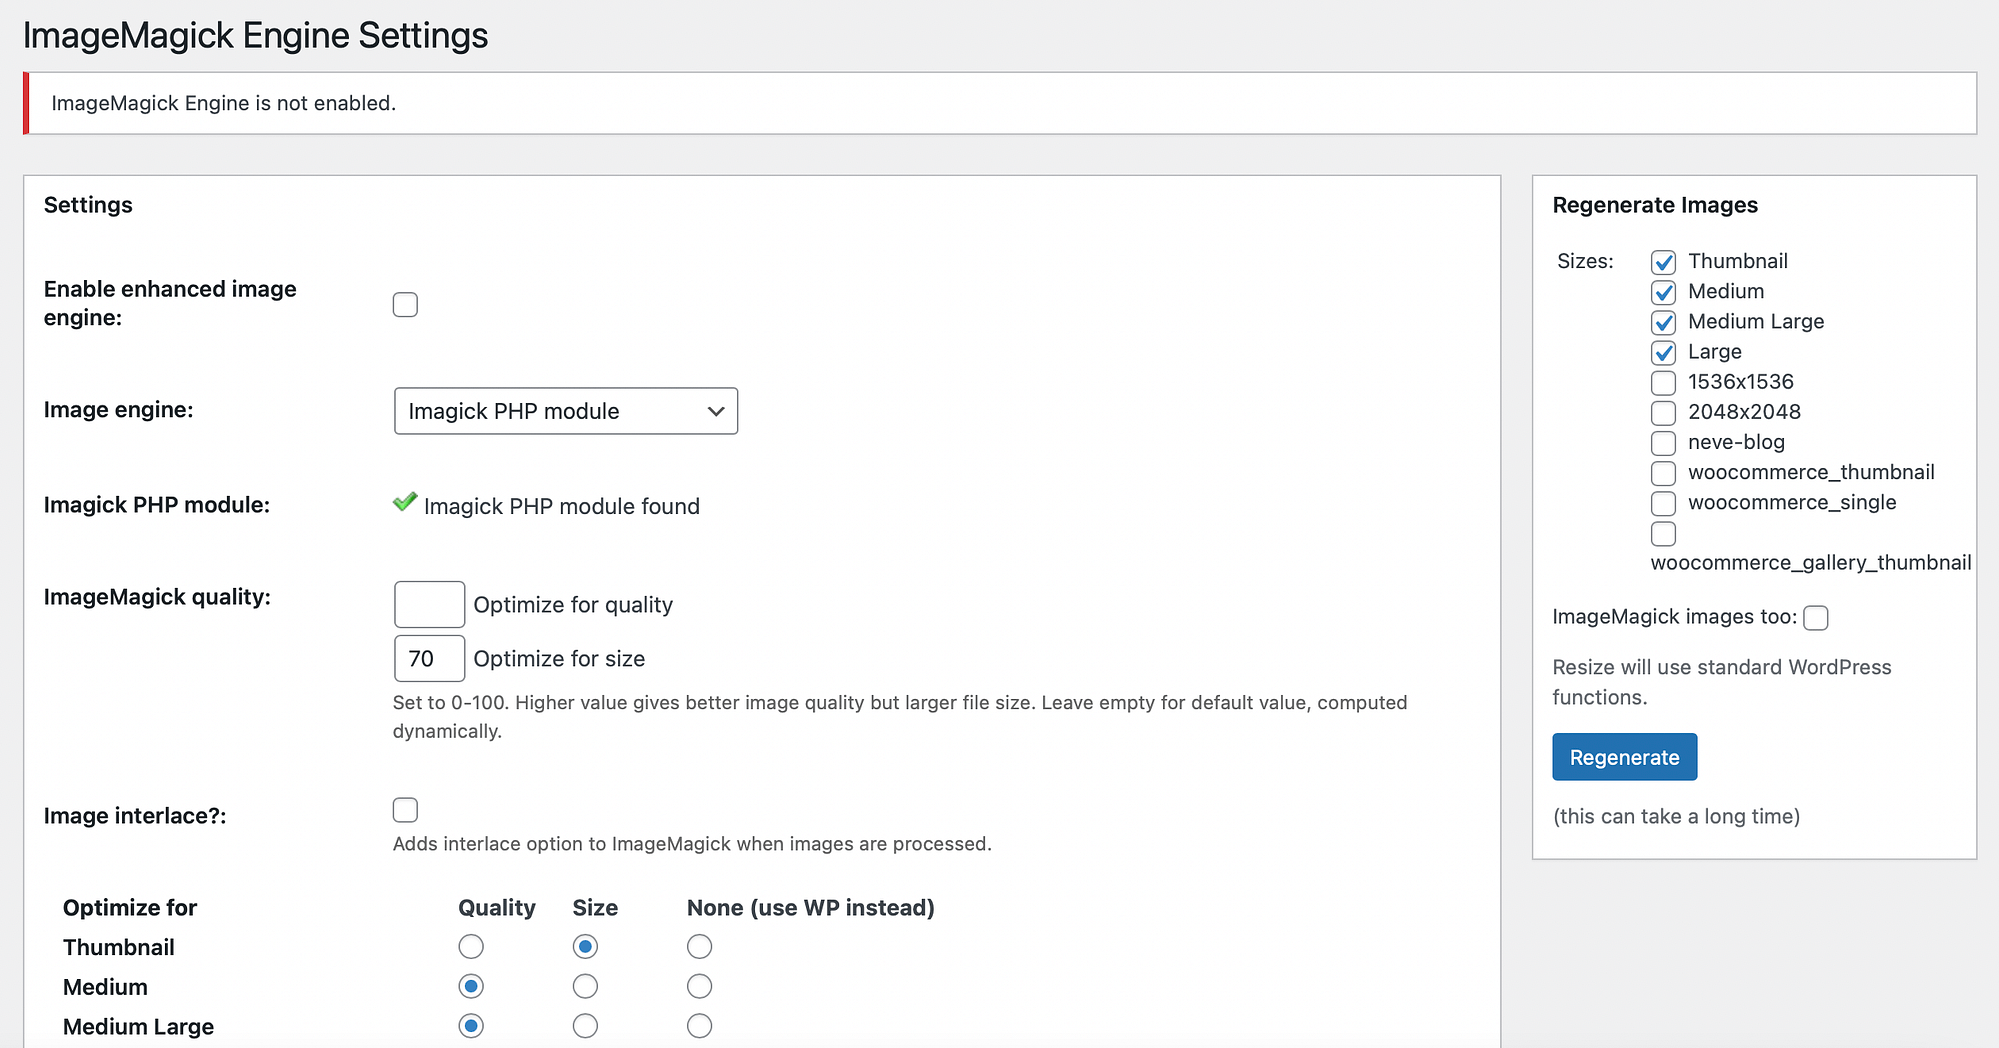
Here, you may receive a message that the ImageMagick Engine is not enabled. If this is the case, all you need to do is tick the box where it says Enable enhanced image engine. Now, click on Save Changes.
Step 2: Customize the WordPress Imagick settings ⚙️
Now that you’ve activated ImageMagick Engine, you can customize the plugin’s settings. Scroll down to the Optimize For section. Here, you’ll see all the different image formats that WordPress supports:

This is where you can determine whether you want WordPress Imagick to focus on image size or quality for each of the image types.
For example, you might like to change the way that Imagick handles all thumbnails on your site. If you check the Size box, this will result in a very small file size, but it will also produce a lower-quality image. However, this dip in quality may not be very noticeable since thumbnails are very small images anyway.
But, for large images, it can be more beneficial to display a sharp, crisp picture since they’re more easily visible. Therefore, besides Large, you might choose Quality.
Additionally, you can try out different size and quality settings in the ImageMagick quality section:

Simply enter a number between 0 and 100 into the Optimize for quality and the Optimize for size boxes. It’s important to note that a higher value in the Optimize for quality box can result in a larger image file.
If you’re not sure what you want to achieve yet, you can leave the boxes blank and ImageMagick will determine this automatically. Now, click on Save Changes to update your WordPress Imagick settings.
Step 3: Apply your WordPress Imagick settings to existing images 🖼️
At this point, the ImageMagick Engine plugin will only apply your configured WordPress Imagick settings to new images that you upload. However, you might want to apply the Imagick settings to existing images on your site.
To do this, you’ll need to regenerate your existing images. You can do this by going to Settings > ImageMagick Engine. Then, head to the Regenerate Images section to the right of your screen:

Here, check all the image types that you want to apply your ImageMagick settings, too. Then, click on Regenerate. Now, all images on your site will follow your specific WordPress Imagick requirements.
Seeing an “ImageMagick PHP module not found” message?
If you see an “ImageMagick PHP module not found” message next to the Imagick PHP module line in the plugin’s settings, that means that the Imagick module is not installed on your server.
Unfortunately, this is a bit trickier to fix.
If you’re using a WordPress hosting provider, we recommend reaching out to them for help and to see if they can install the module for you.
Otherwise, you’ll need to feel comfortable connecting to your server via SSH and installing the module using commands. Typically, it’s something like sudo apt-get install php-imagick.
Get more control over WordPress Imagick
By default, WordPress uses Imagick to optimize all images that you upload to the Media Library. However, you don’t get any way to control how that optimization works.
Therefore, it’s a good idea to enable WordPress Imagick and customize the settings to improve your website performance.
🎯 To recap, here are three steps to enable WordPress Imagick:
- Install and activate the ImageMagick Engine plugin. 🖱️
- Customize the WordPress Imagick settings. ⚙️
- Apply your WordPress Imagick settings to existing images. 🖼️
Do you have any questions about WordPress Imagick? Let us know in the comments section below!


Or start the conversation in our Facebook group for WordPress professionals. Find answers, share tips, and get help from other WordPress experts. Join now (it’s free)!